Ink Spout

Ink Spout has evolved into Ink Spouts now. It is available at a new address now. www.inkspouts.com We have rebooted it and It's back with lots of stuffs . :D Just go and check it out.

Featured Posts

Ink Spout has evolved into Ink Spouts now. It is available at a new address now. www.inkspouts.com We have rebooted it and It's back with lots of stuffs . :D Just go and check it out.
Showing posts with label Techtics. Show all posts
Friday, September 7, 2012 5 comments

In one of my posts, I talked about how to solve IDM(Internet Download Manager :D ) video playback problem using an extension but that was restricted to Chrome browser. One of our readers asked the solution for Mozilla Firefox so in this post we are covering that problem.

So Here we go. We’ll do that job by installing a userscript userscript (don’t bother about that term ;-) we’re here for that) into Firefox. Just follow the given steps and you can see your problem packing its bags and leaving away. ;-)

To Start with, firstly Install GreaseMonkey (a Firefox add-on). You can find it here. After installing it, You need to restart your browser.

Now next task is to install the userscript. So follow this link and click the button “Install ”on top-right side of page as shown in image below.


When you’ll click on that, it triggers Greasemonkey to pop up the script installation panel. Greasemonkey shows you a list of what sites the script will run on and ask if you want to install the script.


Now it’ll be installed and all your work in done now.

To save a video to your computer…


…click the Download button. A list of available downloads is displayed, sorted from best to worst quality. To save one, simply click on it or right-click and choose Save Link As.... Most computers can play the MP4 format files on the list, but formats like WebM and FLV are also provided for advanced users.

Now just go to Youtube . Watch and save whatever you ever wanted by your Firefox and IDM.
I hope you liked the article. If yes, then please share us and like our facebook page.


Read More.....

Thursday, September 6, 2012 3 comments

Guest Post by Jason  

While you are online, your CPU has a sole identifying IP address just like your residence or workplace address, alerting everybody to whom you are and where you are situated. When you shop online or post emails, your IP is linked with that movement, and it recognizes you in person. Identity thieves and hackers may smash into your computer, check your action, and take your identity or other private information.

Ways to Hide your Internet Service Provider Address (ISP) 


Frequent Internet proxy servers proffer nameless Web browsing ability. Accessing Web sites via these proxies conceal your communal IP address from Web servers, helping to defend your individuality online.  As an option, some persons install particular programs on their computers that as well can conceal their IP address and previous identifying information during the restricted software instead of relying on an exterior server.

     Employ a liberated proxy server to bury your IP address. Proxy servers forward the way that you top by masking your IP address with a fresh one. This method, if persons are trying to path you using the showed IP address, they will hit a barricade once they arrive at the address of the proxy server.
     Surf by means of an add-on proxy. These are rather common with the Chrome and Mozilla browsers. Once in place, an add-on proxy will chunk websites that are trying to notice your IP address. This method, you can stay nameless. You can as well visit sites anywhere your unique IP address has been barred.
     ISPs act as gateways to the Internet, every one of your traffic passing through their routers on the Internet. The provider can just create their kit fall all traffic to- and from the IP addresses that are to be blocked-up. This goes fairly a bit further than straightforward DNS blackouts and the means outlined on top of will perform nothing to assist the situation. What's still inferior is that there might be previous sites at a given IP address and those would be blocked as well.
     It is vital that you do not mistreatment your online secrecy. There are laws in place that are intended to put on trial persons who are culpable of cyber crimes such as cyber attacks, individuality thefts or hacks. Surf sensibly.

The aptitude to conceal an IP address boosts your solitude on the Internet. Other looms to improving Internet solitude also survive and balance each other just like how the Broadband Expert Internet service systemize. Managing Web browser cookies, using encryption when sending personal information, running a firewall and other techniques all donate toward a better feeling of security and safety when arriving online.

About the Guest Author This article was contributed by Jashon Wills.He is an expert of technologies around the globe. He's also an expert on Verizon’s innovation and impacts within the society. Follow him on Twitter at Jashon Wills
Read More.....

Saturday, June 2, 2012

After orders issued by a court in india, some ISPs (the organization which provides you the internet facility known as Internet Service Provider) have started blocking and banning torrent websites (e.g. Torrentz, Piratebay, kat.ph etc) along with video streaming sites (e.g. Vimeo and Dailymotion).


Whenever a user with those particular ISP tries to access these sites, he gets an webpage showing a message as following :

           “Access to this site has been blocked as per Court Orders.“


This banning and blocking thing came into picture after a tamilnadu court issued an order to prevent copyright infringement and piracy. The main ISPs are Airtel and Reliance who have done this job till now. Also other ISPs have blocked a number of websites as per indication by the Central Government. The list of blocked sites can be found here.

But since these torrent sites are good options for countries like india (where a fair and nice internet speed is a dream) because many open source content (Operating systems etc.) are easily downloadable through torrent rather than direct download.

So we are going to tell you how to access these blocked sites. 

Method 1 : Use of “https” instead of “http”
The easiest method I have come across till now is using secured connection that is you have to add an “s” in the end of “http” which will become “https” before the URL in the address bar. The Website will open with full functionality.


Method 2 : Use of Proxy sites
If you want another way then proxy sites would be alternative option which you can find easily by Googling.


I hope this article and these methods helped to access these sites. If you have come across any other method then let’s know by comments. We appreciate them. 


Disclaimer : We DO NOT SUPPORT piracy and copyright infringement. This article is for educational purpose and meant only for legal use.

Read More.....

Friday, June 1, 2012

Internet Download Manager
Internet Download Manager is one of the widely used Download Managers. Due to its simplicity, functionality and user friendly interface makes it quite handy and popular between users. It is also a nifty tool to download videos from various video streaming sites like Youtube, dailymotion and vimeo.

Often Youtube users encounter with a problem that Internet Download Manager downloads videos from youtube with name videoplayback_# . This things not only adds to problem of renaming the videos again and again but also an unmanageable and difficult task to find needed video if not renamed.
As this is not the problem of mine only but of a large number of IDM users who search like “YOUTUBE IDM videoplayback name problem ” etc.

So in this post, I am going to tell you folks a new way to get rid off the problem of renaming or videoplayback name problem.This solution is for Google Chrome users.
Chrome Youtube Downloader
All you have to do is to install a Google Chrome extension Chrome Youtube Downloader and rest of the story I tell you in next steps.

Step 1. Download Chrome Youtube Downloader from here and install it.

Step 2. After installing the extension,  whenever you will open any Youtube page , there will be extra button of Download below the video with various options for downloading (i.e. different quality, resolution and formats).
Download button appears below the video

Various Downloading options

Step 3. Make sure IDM is running in the  background and don’t click on the “Download with IDM” when video is buffering. Just click on Download button and IDM will automatically capture the video with its original name. Simply hit on start download and you’re done.


Also you can choose default  video format and resolution by going into extension setting tab as below.


I hope you liked my article. If you consider it helpful then consider to comment below,like us and share us.
Happy Sharing, Happy Caring. :-)
Read More.....

Monday, May 21, 2012

Most of the internet users who visit social meadia sites like twitter,digg heavily, often encounter with Shortened URLs. You usually come across such links from your trusted ones, but also from across the internet.
hence these shortened URLs become point of suspision as we don't know where we're heading until we get there and possibility of pranks or spams are pretty high.You could be made to compromise with your data if the link leads to malicious site.To prevent from happening that to you, here comes a handy tool Unshorten.It.

Below is the description on this Webapp's site :

Explaining Unshorten.It!

Is that short URL you're visiting REALLY going to contain cute kittens, or instead is it going to mug you and steal your wallet? Unshorten.It! takes any bullets for you, analysing the website for safety and letting you see it before you decide whether to proceed.
As well as telling you the URL that the link points to Unshorten.It! provides you with the title and description tags of the target web page, a screenshot of the target website, safety ratings provided by Web of Trust and will alert you if the website is found in the HPHosts blacklist.*

Unshorten.It is a cool webapp which will help you to determine the safety of the link by expanding it and fetching data from "Web of trust" server.All you have to do is simply copying and pasting the URL into the text bar and click "Unshorten.It!"


Then wait for a while till site processes your link. You will get the following details :

1. Title
2. Destination URL
3. Description
4. Screenshot of the destination (image thumbnail)
5. Safety Ratings (Provided by WOT)

Also, you can download and install Chrome Extension and Firefox Add-on to do the same task without visiting this site. Simply right click on the URL and choose "Unshorten it" from context menu. Just follow this link - Unshorten.It Extensions

Note : AdF.ly links are incompatible with this service - This is due to the way in which they redirect users and cannot be solved on this service's end.

I hope you enjoy this article and tip to stay safe online from malicious sites. ;)
Happy Browsing, Stay Safe. :-)
Read More.....

Sunday, May 20, 2012

So, what method do you use frequently to shutdown your computer?
I guess it would be clicking on shutdown button via going through Start button (more often).
Here I am sharing few another methods to shut down your PC so let’s move ahead to find out more interesting ways.

1. The Standard Approach (Mouse Only): Click on
Start button and then navigate to Shut down menu and click on it. It’s finished.

2. Regular Approach (Keyboard only): Press Windows Key and then hit “U” key two times repeatedly and fast.

3. Shortcut Approach : Create a shortcut for shutdown and place it on desktop or in quick launch bar. You can follow these instructions shown by screenshots.

                               
                Right click on desktop and do as above.


Type "shutdown -s -t 00" and click next. after that click on finish.


4. Press the Win + R key to open the run window. Type “shutdown -s -t 00”. [s means shutdown while t means the duration after which you want to initiate the shutdown process]. If some open processes or application won’t let you turn off, append a -f switch to force a shut down by closing all active processes.
.
5. Press Win + M key to minimize all active windows and press  Alt + F4 to bring shutdown options dialogue box. Choose shutdown from drop-down list and press Enter.


6. One more simple but less know way is to use Run window. It’s a bit long but a way too. ;-) . Press Win + R and now type “cmd” and enter. then type “Shutdown –s –t 000 and press Enter. Piece of Cake. :-)


7. You can also download utilities from internet which can perform the task of shutdown for you. Go here. Shutdown Utility .

8. The last and the most powerful way (yeah ;-)) is to set your power button on Shutdown. Just press or hold down the power button and your system will shutdown. But it is advisable only in case of system freeze or deadlock conditions.


I hope you've enjoyed the article.If i missed something then feel free to comment below and will update the same.
Till then, Happy Geeking, Happy Inking ;)
Read More.....

Many of us are fond of sticking to our system and keep surfing over the ocean of information (Internet - I know I exaggerated it :-P) and eating those chunks of articles, stories like a hungry man.
Often, there are situations when you pauses your reading just because of being unaware of the meaning of a particular word. Now you copy that word and paste it into any dictionary (if installed in your computer) or moreover in Google Search Box to know the meaning.
I know it’s pretty headache to do while reading something interesting.
So here is a simple neat and clean solution (for two most popular web browsers – Google Chrome and Mozilla Firefox).

Google Chrome :

        Step 1. Go to this link Google Dictionary by clicking on it.
        Step 2. There will be a webpage looking like the below image.


             Step 3. Click on “Add to Chrome” and a dialogue box will open asking you to “install”. Click on “Install”.
             Step 4. Now you are done. While reading anything on internet, Simply Double click on a word and it’ll show the meaning in yellow balloon. It’s a simple as that.


     Mozilla Firefox : 
      There is no add-on for Mozilla Firefox like Google Chrome has Google Dictionary. But similar solution is there. :-D . It is “Wiktionary and Google Translate” add-on which gives you similar working as of Google Dictionary.

             Step 1. Follow this link Wiktionary and Google Translate by clicking on it.

              Step 2.  Click on “Add to Firefox” and now add-on will be downloaded and it’ll ask you to install it.


                Step 3.  Do as it says and your task is finished. Just double click on word and enjoy seamless reading.

     So this was all about getting word meaning and definitions while browsing and reading stuffs over internet.
I hope this article will help you. Specially the students and the reader community.
Happy Reading folks. :-)


Read More.....

Friday, January 13, 2012 0 comments

Moving forward in our new series Reclaim your Nascent PC, here I am going to share a new tip with you. Often whenever you surf internet, temporary internet files are stored in your system for quick viewing. But with increasing time, the number of these files also increases.
Further, whenever you use a program, it sometimes saves temporary information which keeps on occupying more and more space in your harddisk.
Morever, windows keeps copies of all pictures, videos and other documents thumbnails. In addition to these, whenever your system encounters any problem or error, it stores the relevant information in files for error reporting and solution checking.

The sum of all above facts is that these useless(for a normal user :D) occupied memory space can be freed without any problem. You don’t need any particular software or utility for this purpose.
Here we go in simple steps.
  • Press Win + E key or click on My Computer. Right Click on your Operating System drive (i.e. C drive commonly) and choose "Properties".


  • In Properties Dialog box, choose "Disk Cleanup" option.


  • After clicking on that button, there will an activity like below in image.It will take few seconds.


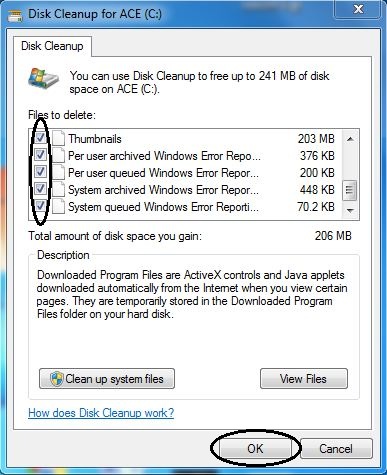
  • Now there will be shown a disk cleanup window. Check all appropriate options and click on OK button.


  • On clicking OK button, again a window will appear showing disk cleanup process.After finishing that, you are done.

This is the whole thing you have to do.
Simple!!!!!!!!!! Isn't it? :)
If you like it,leave your precious comment as feedback.
Meanwhile you 'd like to check first post of this Series out.

See you Soon. Till then Enjoy your Nascent PC. :-)
Read More.....

Tuesday, December 20, 2011 0 comments


Got your Facebook timeline profile!!!!!!
Yes then yon know how to keep pace with time. Yet not , Don't worry, get your Facebook timeline profile here and click on "Get it now".
If you are lazy enough to do that then don't worry ,  Facebook will do that for you on 22th of December. ;-)

Welcome Page of Facebook Timeline
This is how your profile will look like..


So in this post i am trying to show few points of Timeline feature of profile.
You can actually turn your profile into your autobiography as in Facebook Timeline , you can share your all lifetime events(since birth), your photos, stories and all other experience that reflects your life.


You can add any information of your life whether it be your first school or the day you met with your first crush or the day you got  first in any competition at that particular time. Isn't it cool!!!!
If you have added your family members in your Facebook profile then they will also be shown in your Timeline .


So you can easily conclude that a well-managed and informative timeline is not less than an Autobiography (But Obviously You're not going to get Booker for that ;-))
Life Till Now in Facebook Timeline

So what are you waiting for?
Just gear up with a mug of Tea/Coffee and Create your Autobiography using Facebook Timeline with intuitive and Well-descriptive photo rich features.

Have A Great Autobiography!!!!  :-)


P.S.- If you find this article interesting, share this with your friends and Let me know how much you liked it by commenting below.
Read More.....

Saturday, December 10, 2011 0 comments

Started your system and now sitting before your system and waiting for loading its services and applications (in simple language taking too long to start) takes little longer and it irritates too when you want to do your work quickly.
Sounds similar…
It occurs when you have installed application and softwares in a large number and these application makes their places in windows startup list.
Obviously too many applications in startup, too much time to boot completely.
Here is a way to get rid off from this problem and it requires not any software.

Step 1 : Press Win+R key and Run window will appear. Type “msconfig” without quotes and hit OK.


Step 2 : Go to startup tab and uncheck irrelevant and unnecessary applications from here.


Step 3 : Now simply click Apply,OK and new dialogue Box will open with two options.
“Restart” and “Exit without restart”
choose as per your wish. And now you are done.


Enjoy your system with better performance. :D


Read More.....

Saturday, December 3, 2011 27 comments

MicroMax Datacard tweak

Well, Cellphones have become old names for using internet on PC.
Most of the Folks use DataCards for surfing,browsing,downloading content (and whatsoever many things) and among these datacards most common name is MicroMax Datacard.
I also use MicroMax MMX352G 3G USB Manager(simply the datacard) for my internet needs.
The problem with this datacard is the annoying and irritating site (so called Micromax : Landing page) which opens all of a sudden in a new tab or window.
Here is the way to change that site and you can change it to your favorite site like Google,Facebook or yahoo etc.

  • First of all locate your data-card's installation folder (in Window 7 it is "C:\Program Files (x86)\MMX352G 3G USB Manager").


  • In that folder locate the UsbModem configuration settings file (which might be with another name depending on your model).

  • Now Right Click on that file and choose edit option, A notepad will open something like below. Look for the HomePage and change the URL/ address according to your wish. (I've changed it already which was "http://miapps.micromaxinfo.com/home.php").


Now save and close this file. You have got rid off from that annoying page.
Enjoy your surfing(net surfing :D).

Before doing this procedure close datacard application and  exit from it in notification area also.


Video Tutorial

Let me know if you like this article. :) (obviously by commenting ;))
Read More.....

Most Trending

Recent Posts

Recommend us on Google!

featured-slider

Labels

Bloggers.com

Bloggers - Meet Millions of Bloggers